![週末Pythonゆる講座の登場人物(ぶち先生とゆうちゃん)](https://smart-hint.com/wp-content/uploads/2022/02/header.png)
目次
Pythonを始めてみる
![](https://smart-hint.com/wp-content/uploads/2022/02/男性_2.png)
さっそくPythonを始めていきましょう
以前、説明したGoogle Colaboratory(グーグルコラボラトリー)を使いましょう
![](https://smart-hint.com/wp-content/uploads/2022/02/女性_1.png)
Googleアカウントがあれば無料で使えるんですよね!
![](https://smart-hint.com/wp-content/uploads/2022/02/男性_1.png)
そう!細かい設定方法はこの記事に載っているので、Stepに沿って設定してみてください!
![](https://smart-hint.com/wp-content/uploads/2022/02/女性_2-1.png)
すぐにやってみます!
![](https://smart-hint.com/wp-content/uploads/2021/03/Python-Setup_2-520x300.png)
![](https://smart-hint.com/wp-content/uploads/2022/02/男性_3.png)
設定はできましたか?
![](https://smart-hint.com/wp-content/uploads/2022/02/女性_4.png)
はい!起動できました!でもどう使えばいいか分かりません・・・
![](https://smart-hint.com/wp-content/uploads/2022/02/男性_2.png)
それではPythonの使い方についてご紹介していきますね!
ノートブックを使いこなす!
![Google Colaboratoryのイメージ](https://smart-hint.com/wp-content/uploads/2022/02/image-31.png)
![](https://smart-hint.com/wp-content/uploads/2022/02/男性_1.png)
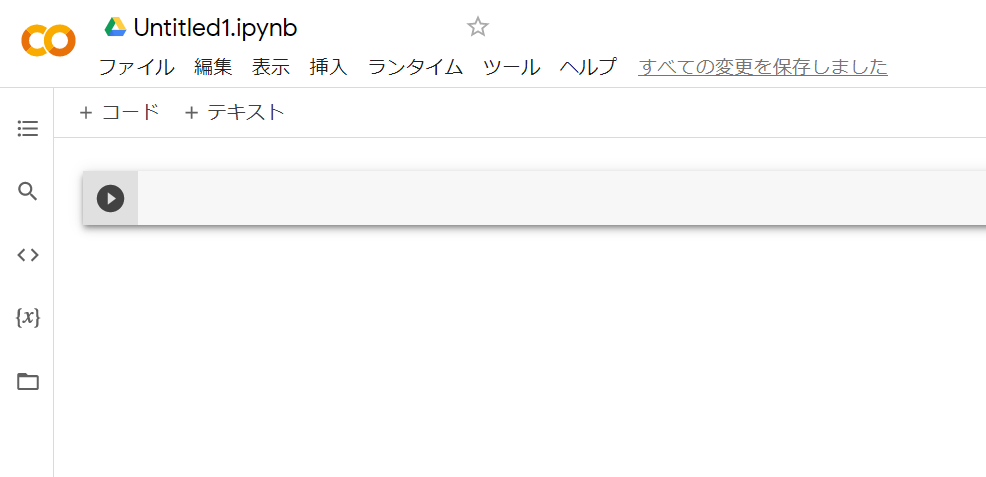
Pythonのこの画面は「ノートブック」と呼ばれていて、コードを書いたり、その結果を出力することができるんです!
文章やタイトルを書いて、どういう処理をしているか記述することも可能です
![](https://smart-hint.com/wp-content/uploads/2022/02/女性_3.png)
プログラミング言語って黒い画面に書いていくイメージでした
![](https://smart-hint.com/wp-content/uploads/2022/02/男性_2.png)
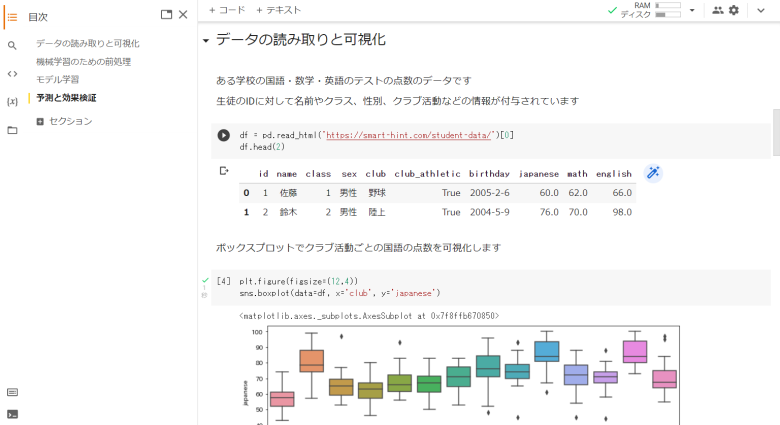
Pythonノートブックは非常に便利で、表やグラフをノートブック内に可視化できます!
またコードをコピーしたり、ミスを見つけたりできます
![](https://smart-hint.com/wp-content/uploads/2022/02/女性_1.png)
なるほど!躓いた部分を先生に見てもらう時も便利ですね!
早く使い方教えてください!
![](https://smart-hint.com/wp-content/uploads/2022/02/男性_2.png)
まず覚えて欲しいのは2つの実行方法です
【Ctrl】+【Enter】でコードが実行される
【Shift】+【Enter】でコードが実行されて、次のコードに行く
![](https://smart-hint.com/wp-content/uploads/2022/02/女性_1.png)
【Shift】を押しながら【Enter】を押すんですね!
![](https://smart-hint.com/wp-content/uploads/2022/02/男性_4.png)
そう!試しに下のコードを実行してみましょう
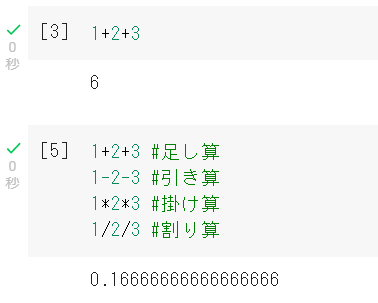
Pythonでは数式を入れるとその答えが出ます
1+2+3
![Google Colaboratoryの実行結果](https://smart-hint.com/wp-content/uploads/2022/02/image-32.png)
![](https://smart-hint.com/wp-content/uploads/2022/02/女性_1.png)
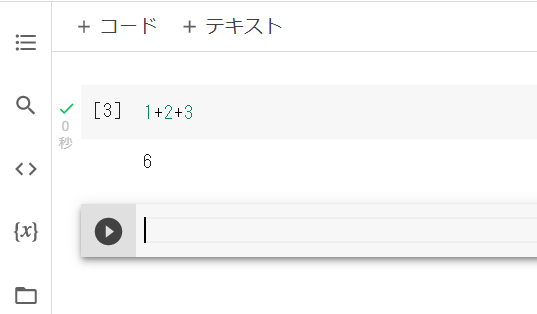
答えの「6」が下に出て、次のコードに移動しました!
![](https://smart-hint.com/wp-content/uploads/2022/02/男性_2.png)
実は1つのコード内に、改行していくつも処理を書くことができます
![複数のコードをGoogle Colaboratoryに実行する](https://smart-hint.com/wp-content/uploads/2022/02/image-33.png)
![](https://smart-hint.com/wp-content/uploads/2022/02/女性_3.png)
複数の処理をまとめてかけるんですね!
でも結果は1つしかでません・・・
![](https://smart-hint.com/wp-content/uploads/2022/02/男性_1.png)
Pythonは「結果を出力する処理」に関しては、最後だけ実行されるんです
![](https://smart-hint.com/wp-content/uploads/2022/02/女性_1.png)
なるほど・・・
![](https://smart-hint.com/wp-content/uploads/2022/02/男性_4.png)
printを使えば解決できるので、いつかご説明しますね~
![](https://smart-hint.com/wp-content/uploads/2022/02/男性_2.png)
あと四則演算の記号が、学校で習った数学と違うので気を付けてください
- 足し算 +
- 引き算 –
- 掛け算 * ※アスタリスク
- 割り算 / ※スラッシュ
![](https://smart-hint.com/wp-content/uploads/2022/02/女性_3.png)
慣れるしかないですね・・・
![](https://smart-hint.com/wp-content/uploads/2022/02/男性_2.png)
他にもノートブックの便利な機能があるのでご紹介しますね!
![Google Colaboratoryの操作方法のイメージ](https://smart-hint.com/wp-content/uploads/2022/02/image-34.png)
![](https://smart-hint.com/wp-content/uploads/2022/02/女性_1.png)
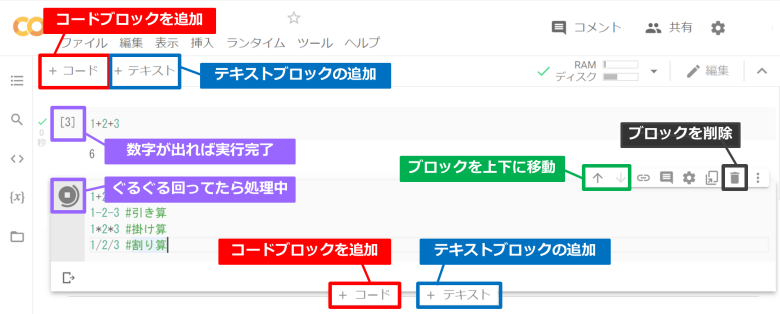
ブロックを追加したり、移動したり、削除したりできるんですね
![](https://smart-hint.com/wp-content/uploads/2022/02/男性_2.png)
そう!これらの機能を組み合わせて、「ノートブック」を作成することができます
![Google Colaboratoryでノートブックを作成していくイメージ](https://smart-hint.com/wp-content/uploads/2022/02/image-36.png)
![](https://smart-hint.com/wp-content/uploads/2022/02/女性_5.png)
Pythonを使うイメージはつかめてきました!
ノートブックにテキストを入れる
![](https://smart-hint.com/wp-content/uploads/2022/02/男性_1.png)
最後にノートブックにテキストを入れる方法をご紹介します
![](https://smart-hint.com/wp-content/uploads/2022/02/女性_4.png)
どうしてテキストを入力する必要があるのか、改めて教えてください!
![](https://smart-hint.com/wp-content/uploads/2022/02/男性_2.png)
テキストを入れるのは「どういう処理をしているか」を明確にできるためです
どうしても他の人が書いたコードって分かりにくく、たまに自分でも分からなくなります・・・
![](https://smart-hint.com/wp-content/uploads/2022/02/女性_1.png)
たくさん処理を書いていくと迷子になるってことですね!
![](https://smart-hint.com/wp-content/uploads/2022/02/男性_4.png)
そう!そのためにテキストを入れる方法をご紹介します
実は2つの方法があります
- Markdown(テキストブロック)で記入
- コード内にコメントアウトで記入
![](https://smart-hint.com/wp-content/uploads/2022/02/女性_4.png)
マークダウン?コメントアウト?初めて聞く言葉です・・・
![](https://smart-hint.com/wp-content/uploads/2022/02/男性_2.png)
まずはMarkdown(テキストブロック)を説明します
ノートブックの「テキスト」を追加して文字を記入する方法がこちらですね!
![](https://smart-hint.com/wp-content/uploads/2022/02/image-40.png)
![Google Colaboratoryのマークダウン方式のイメージ](https://smart-hint.com/wp-content/uploads/2022/02/image-37.png)
![](https://smart-hint.com/wp-content/uploads/2022/02/女性_2-1.png)
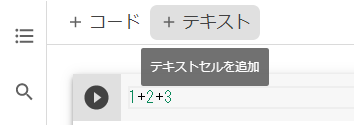
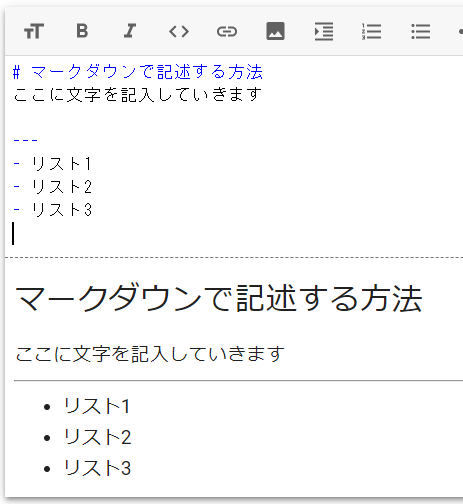
「コード」ではなく「テキスト」の部分に書いていくんですね!
#を使うと文字が大きくなるのでしょうか?
![](https://smart-hint.com/wp-content/uploads/2022/02/男性_2.png)
これのMarkdownの記述方法の特徴で、#は「見出し」を意味しています
![](https://smart-hint.com/wp-content/uploads/2022/02/女性_4.png)
どういうコードを書いていくかを「見出し」に書いていくんでしょうか?
![](https://smart-hint.com/wp-content/uploads/2022/02/男性_4.png)
その通り!分かってきましたね!
続いてコード内にコメントアウトという機能を使って、コメントを書いていきます
実はここでも#を使います
![Google Colaboratoryのコメントアウト](https://smart-hint.com/wp-content/uploads/2022/02/image-39.png)
![](https://smart-hint.com/wp-content/uploads/2022/02/女性_4.png)
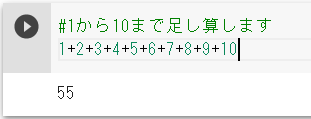
#の後ろに続けてコメントが書けるんですか?
![](https://smart-hint.com/wp-content/uploads/2022/02/男性_2.png)
そう!正確に言うと#以降はコードとして扱われないようになっている
コメントアウトに関しては別の使い方もあるから、ぜひ見てみてください!
![](https://smart-hint.com/wp-content/uploads/2021/07/コメントアウト_2-160x160.png)
![](https://smart-hint.com/wp-content/uploads/2022/02/女性_1.png)
はい!分かりました!
![](https://smart-hint.com/wp-content/uploads/2022/02/男性_1.png)
今回はPython(Google Colaboratory)の使い方についてご説明してきました
次からは早速データを読み取る方法をご紹介します!
![](https://smart-hint.com/wp-content/uploads/2022/02/女性_5.png)
学校ではノートがキレイと褒められていたので、Pythonでも頑張ります!
まとめ
- Google ColaboratoryはGoogleアカウントがあれば無料で使える
- 【Shift】+【Enter】で実行→次のコードに移動できる
- ノートブックにコードやテキストを入力できる
![](https://smart-hint.com/wp-content/uploads/2022/02/ゆる講座_Excelデータ-520x300.jpg)